
Windows is generally acknowledged as one of the best operating systems for gaming; Windows 10 and Windows 11 are two popular options among gamers worldwide. Even though Windows 10 will still be a popular choice in 2024, Windows 11 comes with interesting features that will appeal to gamers, like Auto HDR and support for Android apps.
Nearly all popular PC games from the past few decades are compatible with Windows 10, but you can also adjust several internal settings and third-party apps to get the best gaming experience. However, for an optimal gaming experience, Windows 11 may require some fine-tuning, as it may not provide the best performance right out of the box. Investing time in optimizing Windows 11 for gaming is highly recommended, as it can unlock additional performance on your PC, ensuring you enjoy the best gaming experience possible.
First and foremost, you should take the initiative to optimize Windows 10 or 11 for an optimal gaming experience. This guarantees that you reach your maximum potential and address potential challenges before they become issues.
This blog discusses how to get the most out of your Windows 10 and Windows 11 computer’s performance when it comes to gaming.
- Disable the Enhance Pointer Precision option
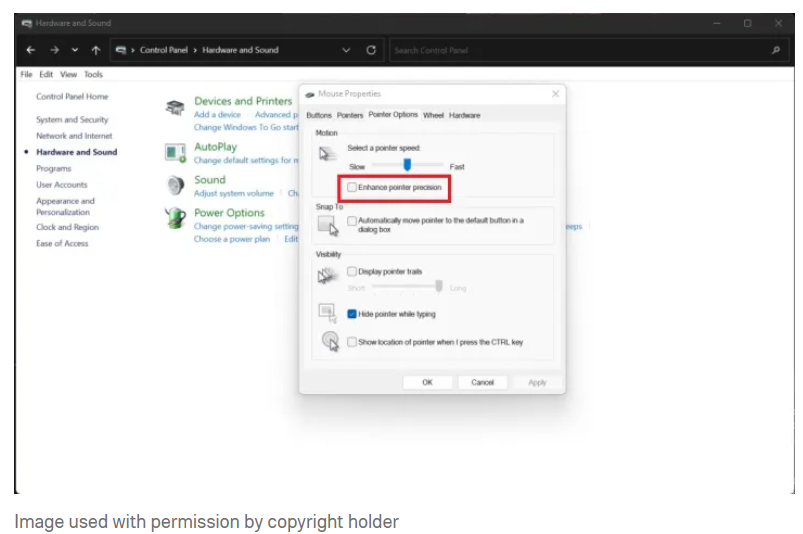
Your mouse is the ideal place to start optimizing Windows for gaming. Windows comes with the Enhance Pointer Precision feature enabled by default. This feature functions as a kind of mouse acceleration, changing the cursor’s speed by increasing or decreasing based on the mouse’s movement speed.
This feature is not ideal for gaming, where swift mouse movements or precise corrections can significantly impact performance. While it may seem like common knowledge, there are instances of individuals gaming on a PC for months without realizing that mouse acceleration was active.
Step 1: Type “Control Panel” into the search bar and press Windows + S to open the Control Panel.
Step 2: Choose “Hardware and Sound,” then select “Mouse” under the “Devices and Printers” section.
Step 3: Go to the “Pointer Options” tab, then deselect the box next to “Enhance pointer precision.”
Step 4: Try using third-party programs like Razer Cortex if Game Mode does not work. You can find comprehensive instructions on how to achieve this as well as other helpful tips in our guide on increasing frame rates without buying a new GPU.

- Consider utilizing Game Mode or a Game Optimizer.
Both Windows 10 and Windows 11 come with a feature called “Game Mode” that automatically allocates resources to enhance gaming performance. Though its primary goal is to enhance gameplay, there are rare instances in which Game Mode might unintentionally cause problems with performance. Still, it is a good idea to activate Game Mode. Alternatively, you can explore options like Razer Cortex, which has performance-enhancing features without any possible downsides.
Step 1: Step 1: Use Windows + S to open the Settings screen, then type “settings” into the search bar.
Step 2: Choose Game mode after choosing Gaming from the left menu.
Step 3: Set the slider to “On.”
Step 4: If you are having trouble using Game Mode, try using a third-party tool like Razer Cortex.

- Stop Automatic Windows Updates
It is not a good idea to disable Windows’ automatic updates since they frequently fix important problems that users might not be aware of. Disabling them requires registry hacks. Microsoft does, however, provide the ability to stop pause updates automatically for a maximum of five weeks, and Game Mode ensures that these will not interfere with your gaming sessions.
Step 1: By using Windows + S, you can open the Settings screen and search for “settings.”
Step 2: Select Windows updates from the left menu.
Step 3: Under More Options, choose Pause Updates.
Step 4: While on this screen, be sure to look for updates, as installing the latest drivers and Windows updates can significantly enhance your gaming performance.
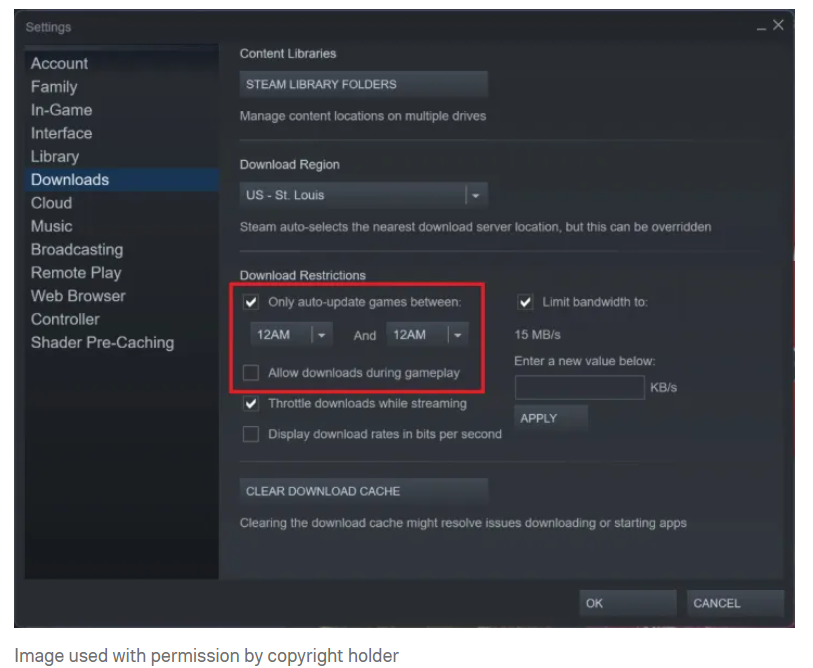
- Bring up Background Downloads in Steam
For most PC games, Steam serves as the DRM (Digital Rights Management) platform and automatically manages game updates in the background. It can install games while you are playing them, which could harm performance.
Step 1: Open Steam and choose Steam from the menu in the top-left corner. Then, select Settings.
Step 2:Step 2: Select the menu’s Downloads tab and uncheck the box that says “Allow downloads during gameplay.”
Step 3: Check the Only auto-update games between boxes and choose a range of times when you’re not using your computer.
Step 4: Steam automatically updates all games by default; there is not a general setting to disable this feature. Therefore, it is wise to specify an automatic update time. Although it is not possible to turn off automatic updates for all games collectively, you can disable them one game at a time.
Select the preferred game, right-click on it, and select Properties. After that, select the Updates tab. Select the option “Only update this game when I launch it” from the first dropdown menu. Usually, this setting is left disabled to avoid the inconvenience of waiting for a large update to finish when you are eager to play a game.
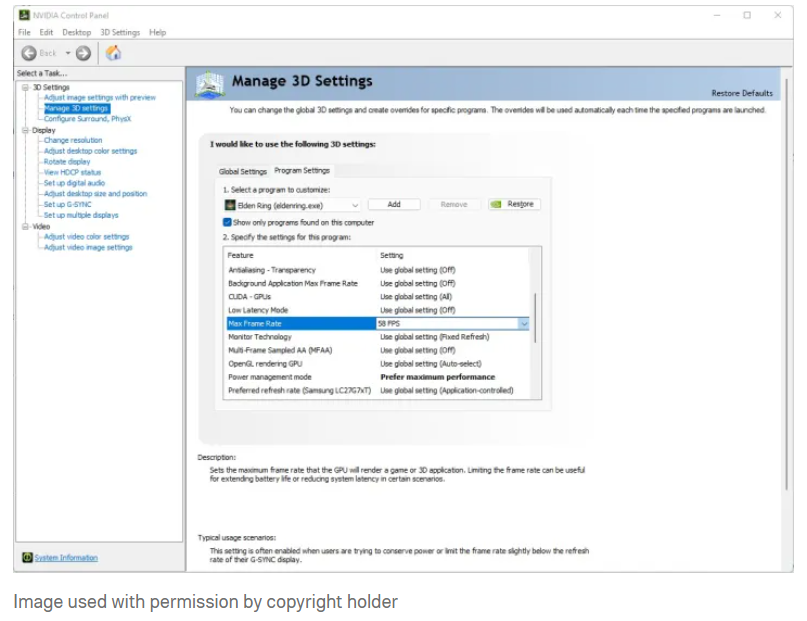
- Set up GPU Software
Both AMD and Nvidia provide software for their GPUs, and adjusting the settings in these programs can significantly enhance your gaming experience. If your graphics card is of the highest quality, you can rest assured that it is supported by equally impressive software.
Step 1: For the Nvidia GPU, make sure you are on the Global settings tab by navigating to “Manage 3D settings.” Set the Max frame rate to correspond with your monitor’s refresh rate and adjust the Power management mode to “Prefer maximum performance.”
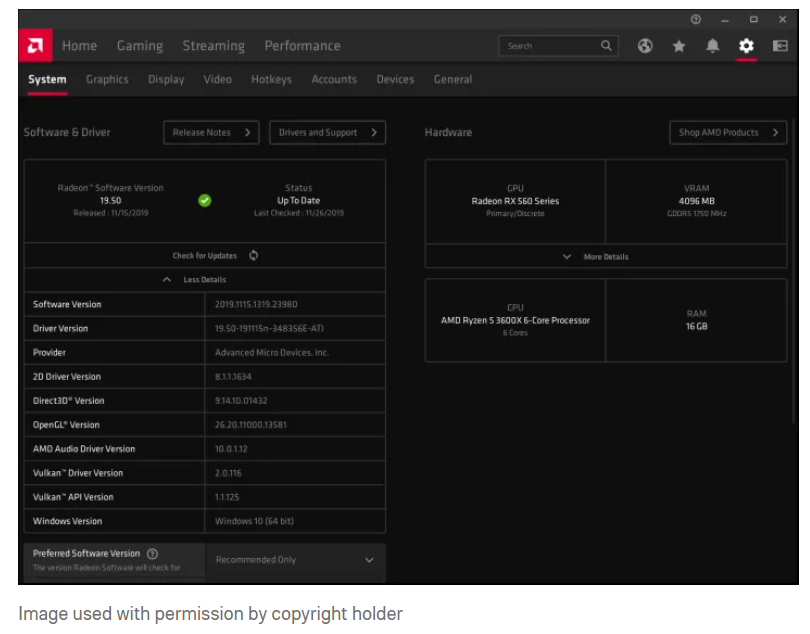
Step 2: When dealing with AMD GPUs, there are more extensive options available. Click on the Settings icon, then choose Graphics from the menu. Enable Radeon Boost and Radeon Anti-Lag for an enhanced and smoother experience.
While there are additional options to explore, it is generally advisable to keep them turned off across the board. For more precise control, consider creating profiles for individual games within Radeon Software, allowing you to fine-tune these settings on a more detailed level.
- Keep all of your Drivers up-to-date.
Having software that is up to date is equally important as disabling drivers and other updates when gaming. Updating your drivers regularly is one of the most important ways to optimize Windows 11 for gaming, as bugs and other problems can significantly affect your computer’s performance.
Step 1: Begin searching for new GPU drivers. New drivers can be found in GeForce Experience for Nvidia and Radeon Software for AMD.
Step 2: Windows update will identify the majority of your other drivers. Navigate to Settings, then select Windows Update before selecting Check for Updates. Upon restarting your computer, install any updates.
Step 3: Windows should recognize the majority of the drivers you need. It is advisable to check for chipset drivers from the manufacturer of your motherboard or the brand of your CPU.
- Turn off the Windows Notifications
Notifications can quickly interfere with your gaming session. They are not only annoying, but they can take control of full-screen apps and cause certain games to crash. You may have to use Windows settings to eliminate notifications, even though Game Mode and programs like Game Booster can temporarily disable them.
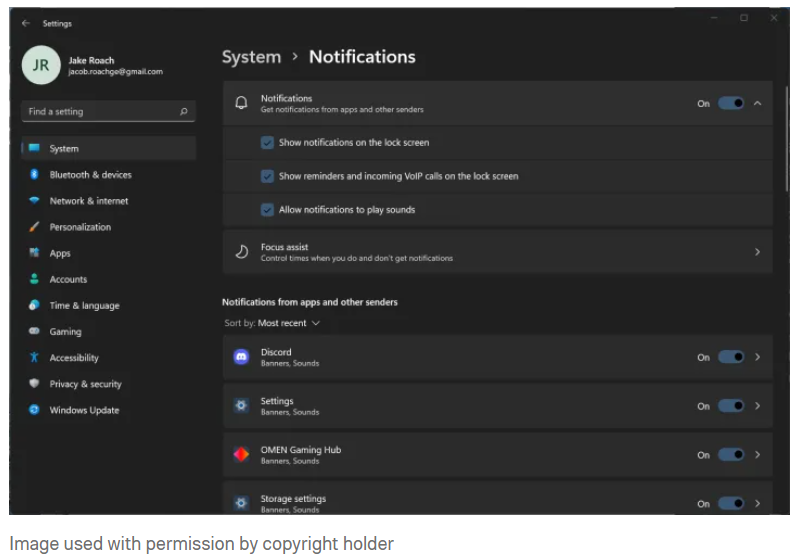
Step 1: Press Windows + S to open the Settings menu, then search for Settings.
Step 2: Choose System, then choose Notifications.
Step 3: Select Notifications once more to expand a dropdown. This is where you configure your settings. To disable all notifications, move the slider to Off.
Step 4: You can adjust the notification preferences or specific apps below. For instance, Microsoft Teams blocks notifications when they are not in use. It also takes up the screen when you are playing Destiny 2. So you disable those notifications when you’re not using the app.
- Enter the Internet’s quick Lane
Windows utilizes Nagle’s Algorithm to improve the stability of internet connections for regular browsing. While it is beneficial in most cases, it might add latency when playing online games over WiFi. It is possible to disable Nagle’s Algorithm using the Windows Registry. But proceed with caution as changing the registry can cause issues.
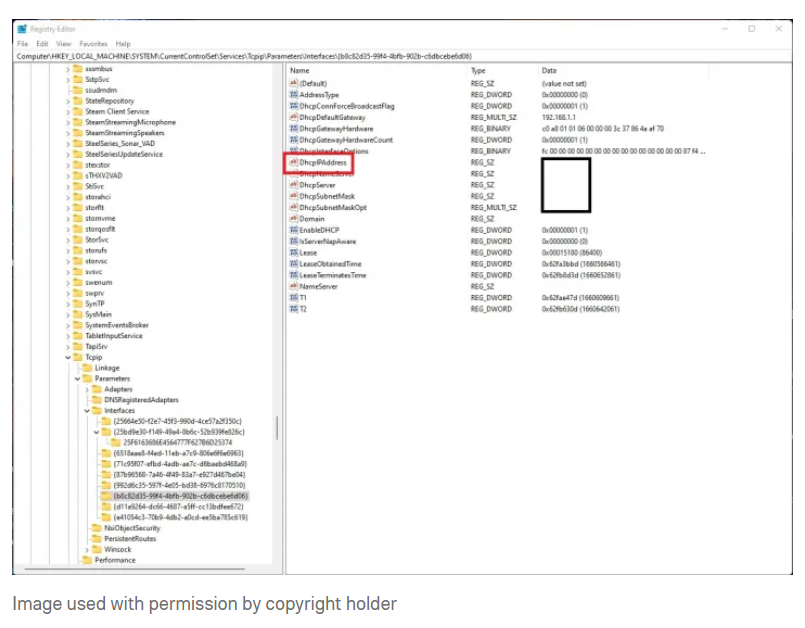
Step 1:Take note of your IP address first. To open Windows Terminal, right-click on the Start menu in Windows. Tap Enter after typing ipconfig. note your default internet adaptor’s IPv4 address (it should be the top one).
Step 2: Right-click on the Windows Start menu once more and choose Run.
To open the Registry Editor, type regedit and hit Enter.
Step 3: Go to the following path:
HKEY_LOCAL_MACHINE\SYSTEM\CurrentControlSet\Services\Tcpip\Parameters\Interfaces
There will be several folders with arbitrary letters and numbers in them. Navigate through these folders until you locate the one containing the DhcpIPAddress entry. There should only be one of these folders, and your IP address will be listed in the Data column. Check this with the IP address you previously noted.
Step 4: In this folder, right-click and choose the New DWORD (32-bit) value.
Step 5: Give the value the name TcpAckFrequency and set it to 1. After that, press OK.
Step 6: Right-click once more and choose the New DWORD (32-bit) value again.
Step 7: Rename the value to TCPNoDelay and set it to 1. Then, click OK.
Step 8: To disable Nagle’s Algorithm, just follow these steps. If you wish to go back, set the values of your new entries’ values to 0 or remove them from the folder.
- Switch off the Xbox Game Bar (and other overlays)
One of the most common overlays in PC gaming is the Xbox Game Bar, which occasionally interferes with gameplay, particularly when using a controller. But you have the option to disable it so that your gaming experience runs more smoothly.
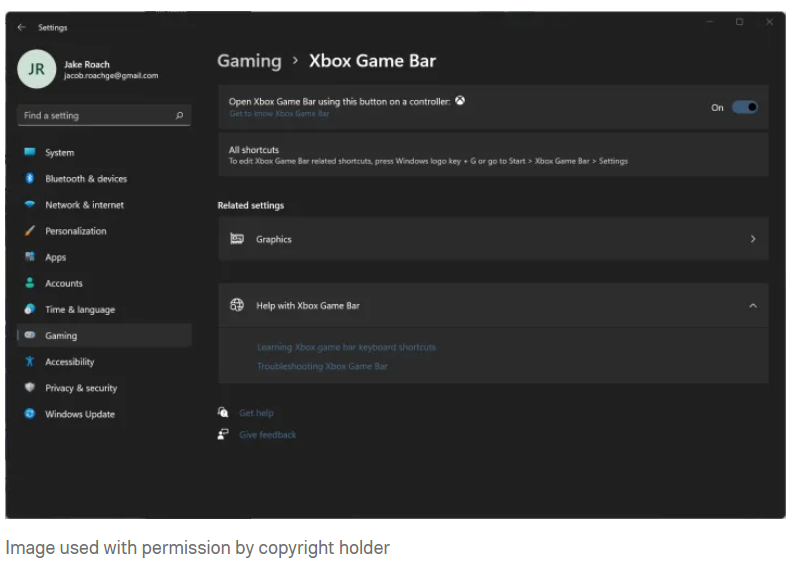
Step 1: Press Windows + S to open the Settings menu, then search for “settings.“
Step 2: Choose Gaming and select the Xbox game bar. You can fully disable it on Windows 10. Only shortcuts that open the overlay can be disabled in Windows 11.
Step 3: Step 3: If you do not want to use the Xbox Game Bar at all, you can uninstall it (though reinstalling can be a bit problematic). To uninstall, open Windows PowerShell and enter the following command: Ge-AppxPackage Microsoft.XboxGamingOverlay | Remove-AppxPackage. Press Enter and wait for the uninstall to finish.
Step 4: You might want to disable some other overlays. For Steam, open the app and follow Steam > Settings to access the proper menu. Choose In-game and uncheck the Enable the Steam overlay while in… box to disable the overlay.
Step 5: There is also an overlay in Discord, which can be annoying. Open the app and go to the Settings menu. Choose Game overlay under the Activity settings section and uncheck the box next to Enable in-game overlay.
- Terminating Background Processes
Background processes on your computer can consume a lot of system resources, but it can be difficult to find them all. It is tedious to manually close apps from the taskbar, and sometimes additional services continue to run in the background even after you close them. Windows provides the option to set these services up so that they never start in the first place.
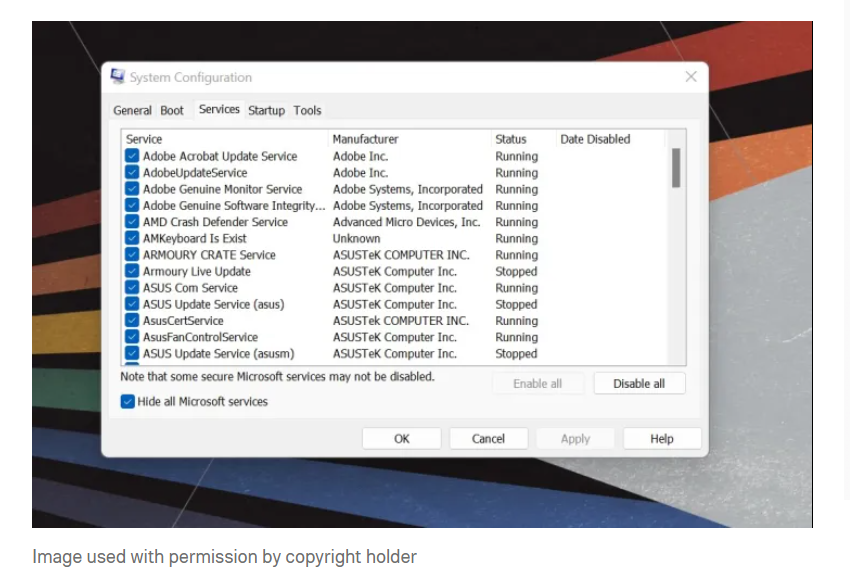
Step 1: Right-click on the Windows start menu button, then choose Run.
Step 2: Type msconfig and press Enter.
Step 3: Choose the Services tab, then click the “Hide all Microsoft services” checkbox.
Step 4: Uncheck the boxes next to the services that you don’t want to run. Remember that some services are necessary for certain apps to function, so before you disable an app, find out what else your computer is running.
- Choose a higher power plan in Windows
When playing games on a gaming laptop, it is advisable to use a higher power plan in Windows. While this may not have an impact on the desktop, it remains an essential step if you’re gaming on the go.
.
Step 1: Open the Control Panel and choose System and Security.
Step 2: Choose Power options, and switch to the High-performance plan. This feature might not exist on all laptops. If so, review the power plan settings in the utility that came with your device from the manufacturer.


