
- Canon Pixma TR 150
| Pros | Cons |
| Quick text printing | The print quality on plain paper is average. |
| Low ink costs | No copy or scan functions |
| Attractive photo prints | Small, monochrome OLED display |
| Optional battery pack | |
| Responsive control panel buttons |
The Canon Pixma TR150 is a compact, portable inkjet printer with basic features and reliable performance. As a single-function printer, it does not have copying or scanning capabilities. However, its compact size makes it easy to carry in a standard backpack.
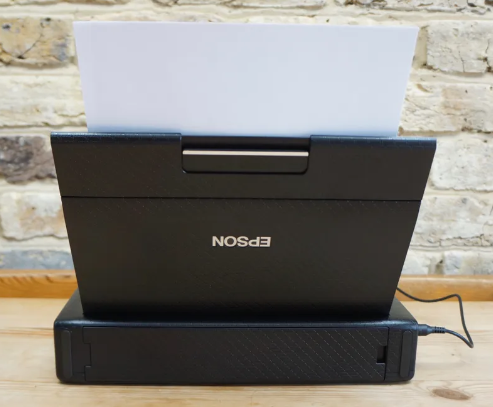
The printer operates on a standard wall outlet. For off-the-grid printing, you can opt for a bundle that includes the printer and a mobile battery, priced under $250. The battery can last for up to 330 sheets on a full charge.
Design
The Canon Pixma TR150 is a compact, portable inkjet printer with basic features and reliable performance. As a single-function printer, it does not have copying or scanning capabilities. However, its compact size makes it easy to carry in a standard backpack.
The printer operates on a standard wall outlet. For off-the-grid printing, you can opt for a bundle that includes the printer and a mobile battery, priced under $250. The battery can last for up to 330 sheets on a full charge.
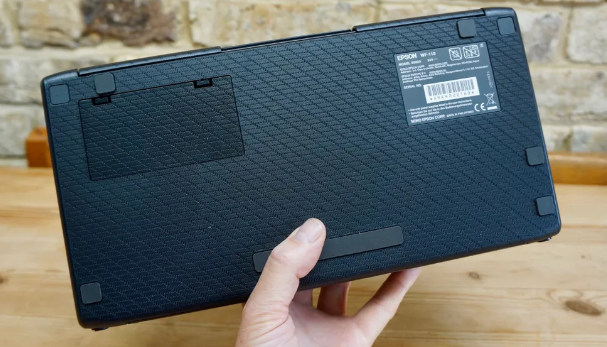
Weighing in at 4.5 pounds, the printer is lightweight for a portable model. Adding the optional battery to the back of the unit brings the weight up to 5.1 pounds. In comparison, the HP OfficeJet 250, including its battery, weighs 6.7 pounds.
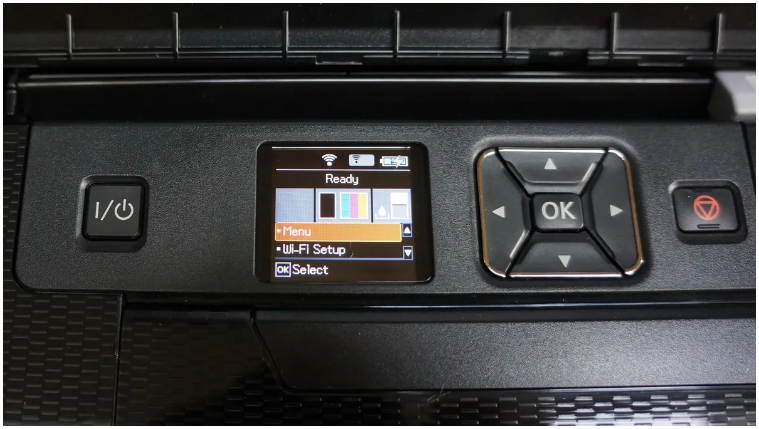
Lifting the lid reveals the control panel located on the top of the printer’s body. It features a four-way control, a small 1.4-inch monochrome OLED display, and a wireless connectivity button.
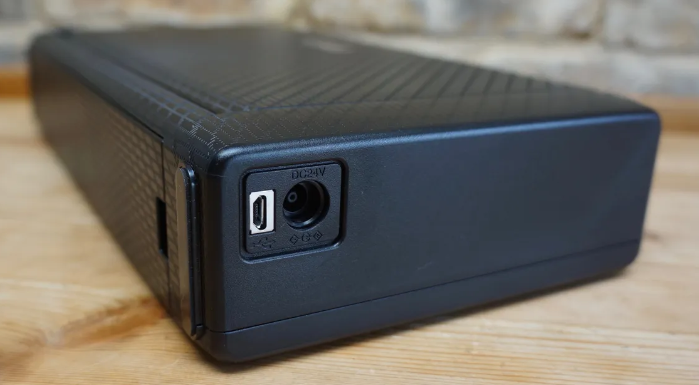
The printer lacks memory card slots. The USB port is situated on the right panel near the back, adjacent to the power port. It supports Wi-Fi and Wi-Fi Direct and comes with a USB-C cable. Additionally, the TR150 supports AirPrint, Google Cloud Print, Mopria, and voice commands via Amazon Alexa and Google Assistant. It also allows device pairing through IFTTT (If This, Then That).
Print Speed
The Pixma TR150 can print a five-page text document in 40.5 seconds, which translates to 7.4 pages per minute (ppm). This is above the average for portable printers, which is 6.9 ppm. However, the HP OfficeJet 250, our top-rated portable printer, was faster, printing text at 9 ppm.
The TR150 was impressively quick at printing text from an iPhone 7, delivering the fastest times we’ve recorded in this test. It printed a single page in just 10.3 seconds and a five-page document in 38.7 seconds, or 7.8 pages per minute (ppm). In comparison, other portable models averaged 14.6 seconds for a single page and 1 minute and 3 seconds (or 4.8 ppm) for a five-page document. The HP Tango X printed a page of text in 11.3 seconds, while several other models were notably slower for the five-page text document, such as the Epson WorkForce EC-C110, which took 54.3 seconds or 5.5 ppm.
The TR150 was also slightly faster than average on mixed text and color graphics. It printed our six-page PDF in 2 minutes and 22 seconds, or 2.5 ppm. This is just above the category average of 2.4 ppm but behind the HP OfficeJet 250, which printed the same document in just under 2 minutes, at 3.1 ppm.
The TR150 also surpassed the category average in photo printing speed. From a Windows PC, it printed a 4-by-6-inch glossy photo at default settings in 1 minute and 4.8 seconds, compared to the average of 1 minute and 11 seconds. At high resolution, the TR150 completed the same glossy print in 1 minute and 45 seconds, significantly faster than the category average of 2 minutes and 6 seconds. However, the HP OfficeJet 250 was twice as fast, producing 4-by-6-inch glossy prints in 37.6 seconds at default settings and 49.5 seconds at high resolution.
Quality
Text printed with the TR150 appeared slightly light, rather than a rich black. The edges of the letters looked somewhat rough and lacked razor-sharp precision. Color graphics printed on plain paper appeared a bit washed out, with visible banding. The graphics also lacked the sharp details, strong contrast, and rich color saturation seen in higher-quality prints from models like the HP OfficeJet 250. In the TR150’s graphic prints, pixels were more noticeable.
However, glossy photo prints from the TR150 were outstanding. The details were very sharp, and the color saturation was quite pleasing. The colors in our landscape photo, in particular, appeared very natural. In comparison, the same print from the HP OfficeJet 250 looked slightly unnatural due to exaggerated yellow tones.
Ink cost and yield
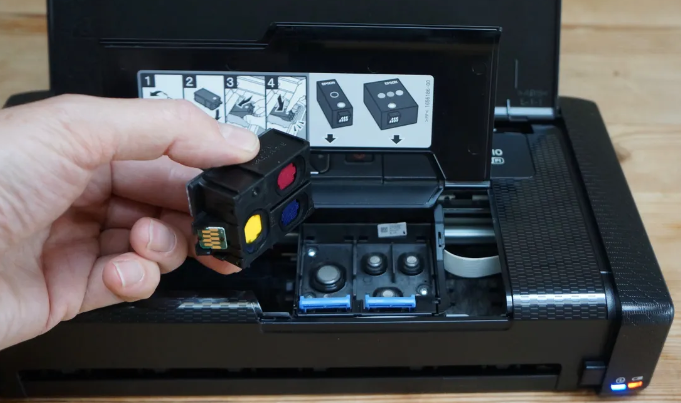
The printer uses two ink cartridges: a dye-based cartridge with three colors (cyan, magenta, yellow) and a separate pigment-based black ink cartridge.
The Pixma TR150 has low ink costs for a portable printer. At 7.5 cents per text page, it is well below the category average of 8.9 cents. In comparison, the HP OfficeJet 250 has an estimated cost of 9 cents per text page.
The same holds true for color pages. At 14.8 cents per page, the TR150 offers the lowest color page cost among the portable printers we’ve tested. Purchasing an ink cartridge bundle can reduce this cost to approximately 12.7 cents. By comparison, the HP OfficeJet 250 has the highest estimated color page ink cost we’ve seen at 23 cents, which only drops to 17.3 cents per page when using high-yield cartridges, an option not available for the TR150.
Set up and Software
Setting up the TR150 was straightforward. After removing a few pieces of packaging tape, lift the lid to access the cartridge bay. First, install the print head, followed by the two ink cartridges. You can download the software online or use the installation disc provided. I used my iPhone to scan the included QR code, which directed me to the online setup instructions. Once the printer completes a print head alignment and you print a test page, it’s ready to use.
To simplify the wireless setup, the TR150 features a dedicated wireless connect button on its control panel. Following the menu instructions on the 1.4-inch OLED screen, I used the WPS connect method; pressing the WPS button on my wireless router connected the TR150 to my network.
Alternatively, you can use Wi-Fi Direct to set up the TR150 as the wireless network connection on your mobile device. I encountered some issues on my first attempts with my iPhone 7; a potential cause was my home wireless network being set to “auto-join,” which interfered with the printer connection. After turning off “auto-join,” I successfully connected and printed to the TR150 over Wi-Fi Direct.
The TR150 starts up quickly, displaying its home screen menu in just 4.2 seconds.
Final Thoughts
The Canon Pixma TR150 delivered solid performance in our tests. Text printing was particularly fast, both from a PC and an iPhone. The printer also boasted faster-than-average speeds for color graphics and photo printing, with a quick startup time of under 5 seconds to get you working promptly. Low ink costs make this portable Pixma very budget-friendly, and its high-quality photo prints are hard to beat. However, the text and color graphics quality on plain paper could be improved.
The top-ranked HP OfficeJet 250 is faster, can copy and scan, and offers superior plain-paper print quality. However, it is also larger and significantly more expensive.
- Epson Workforce WF 110
| Pros | Cons |
| Full-color display | Costly inkjet cartridges |
| Charges via USB | No auto duplex |
| Wi-Fi and Wi-Fi Direct | Lacks flash memory ports |
| High-resolution print quality | Slow to print |
Epson’s newest and smallest printer features built-in Wi-Fi and a USB-rechargeable lithium-ion battery, ensuring true portability. As part of the Epson WorkForce line, it is designed for business users, particularly those who are frequently on the move. This versatile printer accommodates paper sizes from A4 to DL envelopes and can even print on glossy photo paper. With a top speed of 7 ppm, it prioritizes print quality over speed, boasting a high print resolution of 5760 x 1440. The use of pigment ink, instead of dye ink, ensures durable, smudge-resistant prints.
The Epson WorkForce WF-110, priced at $299 (£199 or AU$362), succeeds the nearly identical WF-100. The key new feature of the WF-110 is an optional external companion battery, which extends its print capacity to 360 pages on a single charge, or up to 410 pages when combined with the internal battery.
Design and Structure
The Epson WorkForce WF-110 is designed for life on the go and stands out as the smallest and lightest battery-powered inkjet printer we’ve encountered. While it is larger than pocket-sized thermal printers like the Brother PocketJet PJ-773, it offers the full functionality of an A4 color printer compacted to fit in a handbag.
Compact enough to fit in a briefcase, the Epson WorkForce WF-110 is sturdy and designed for the demands of travel. With its flap closed, it has no protruding parts that could break, and the textured plastic casing reduces the risk of slipping and minimizes visible scratches. Opening the front flap transforms it into a vertical paper input tray that can hold up to 20 sheets of blank paper, with printed pages exiting through a front slot. Since there’s no output tray, it’s best to place the printer on a clean, flat surface.
Besides the power and battery indicator LEDs, all controls and the display are concealed and protected by the articulated flap. Though the display is small, about the size of a postage stamp, it is full-color and highly informative. It is not a touchscreen, so you’ll use the adjacent cursor buttons to select settings and input your Wi-Fi password. To access the inkjet print heads, simply lift the inner flap, like opening a car hood.
There are only two ports located on the left side: one for the power adapter and one for a micro USB cable. The USB cable, included in the box, allows for data transfer and battery recharging when mains power isn’t available. Notably, the battery charges in 2.5 hours via mains power and 10 hours over USB. However, a memory card slot or a USB port for a flash drive, which would have been useful, is absent.
Features and Specifications
The Epson WorkForce WF-110 is a miniaturized color inkjet printer, offering nearly the same functionality as a full-sized model. It supports printing via USB, Wi-Fi, and Wi-Fi Direct in both mono and color. You can print on various media, including envelopes, plain paper from A4 to A6 sizes, and glossy photo paper in different formats. It features a 3.7 cm display for setting paper types and checking ink levels, along with a paper tray that holds up to 20 sheets.
However, portable printers, including the WF-110, have not yet mastered duplex printing, requiring you to manually turn the paper for double-sided printing. Additionally, it lacks NFC connectivity, ports for an SD card or USB thumb drive, a touchscreen, and the capability to print on speciality media such as card stock or parcel labels.
The Epson WorkForce WF-110 can print at a remarkably high resolution of 5760 x 1440, thanks to its Micro Piezo print head, which features 180 nozzles for black ink and 59 nozzles for each color. However, it doesn’t print quickly, with a quoted speed of 7 pages per minute (ppm) for monochrome and 4 ppm for color. When using the battery, the print speed decreases to just 2 ppm for color pages.
By downloading the free Epson iPrint companion app, you can also use voice-activated commands. Through the app’s menu, you can enable Siri or Google Assistant to perform tasks like printing the last photo you took or checking your printer’s ink levels.
Set up
The setup instructions are somewhat lengthy due to the inclusion of multiple languages on each page, but fortunately, you likely won’t need them. Setting up the printer is straightforward: plug it in, turn it on, and insert the inkjet cartridges in that order. Connecting the printer to our Wi-Fi network took a bit more time because entering the password on the small screen is a bit tricky. Additionally, the drivers were not pre-installed on our MacBook, so we had to download them from the Epson website.
Once you’re connected to Wi-Fi and have loaded paper, the Epson WorkForce WF-110 is very user-friendly, thanks to its small but informative color display. Each time you insert new paper, the display prompts you to select the appropriate media from a list. The WF-110 handled thick envelopes without any issues, and we encountered no paper jams or creased pages during our tests. When accessed wirelessly from a laptop and a mobile device, the printer woke up quickly, despite its slower print speed.
Performance
Overall, we were highly impressed by the clarity and precision of the test pages produced by the Epson WorkForce WF-110. The mono text, in particular, remains uncompromised by the miniaturization of this inkjet printer. Even at very small font sizes, each character appears dark and well-defined. The level of detail in graphics and photos is also impressive for a portable printer. However, when it comes to filling in block colors, the results are less consistent, with individual colors not being as bright or vivid as those produced by other inkjets.
The use of pigment ink rather than dye enhances the durability and smudge resistance of printed pages, which is advantageous for on-the-go use. However, it does not improve color fidelity in photographs. Consequently, photos on photo paper appear sharp but tend to have an excess of magenta and lack the finish achieved by Epson’s photo printers.
Additionally, this printer operates slowly, particularly when using battery power. The maximum speed of 7 pages per minute for mono pages is quite slow, and with auto duplex printing not available, we wouldn’t recommend this machine for printing long documents. It’s also worth noting that the tiny inkjet cartridges are relatively expensive, resulting in a considerably higher cost per page compared to regular-sized models.
Final Thoughts
Given its reliable performance and impressive detail and clarity, we definitely recommend the Epson WorkForce WF-110 for anyone who needs to print documents without access to a power source. Its compact size makes it easy to slip into a briefcase, and the ability to charge the battery via USB is a convenient feature. However, if you’re looking to downsize your office printer, this model may not be the best choice. The slow print speed and high per-page cost make it less competitive compared to a small desktop inkjet.
Despite its slow speed and expensive ink, this portable inkjet is ideal for business trips, thanks to its USB-chargeable battery and consistently crisp print quality.
- HP Sprocket Studio
| Pros | Cons |
| Large, high-quality photo prints | Requires a power source |
| Exceptionally user-friendly | Cost per print can be high |
| Wide range of photo editing options |
The HP Sprocket Studio is a new addition to the company’s popular portable printer line. Unlike the wallet-sized 2 x 3-inch prints of its predecessors, this model produces glossy 4 x 6-inch photos, perfect for framing just minutes after capturing the shot on your mobile phone.
The Sprocket Studio uses a process called ‘dye sublimation’ to transfer layers of color onto the photo paper. Although this method is slower than the technology used in standard inkjet printers, it delivers higher-quality results, making it one of the best options for compact photo printers.
To use the Sprocket Studio, you’ll need to download the HP Sprocket companion app, available for both iOS and Android. The app includes a variety of editing features to enhance your prints. During our testing, we found these features quite useful, though some users may find them a bit kitschy.
Unlike the smaller Sprocket printers, the Studio needs to be plugged into a power source when in use. Its larger size also makes it less portable than HP’s other instant printers. However, an optional Power Bank (available in select regions) allows you to take it on the go.
Design
The Sprocket Studio is significantly larger than other printers in the Sprocket series. It measures 169 x 273 x 68mm, compared to the much smaller Sprocket Select, which measures just 142 x 89 x 18mm.
The printer is available in a light grey color that HP calls ‘snow,’ with dark green speckles reminiscent of a speckled egg, adding a touch of character. Otherwise, it has a clean and polished appearance.
A single power button is located on the left-hand side of the Sprocket Studio. The rear of the printer features a proprietary socket for the power cable, which is about the size of a standard laptop charger, adding extra bulk to the already larger Sprocket.
A glowing strip of light on the front indicates when the printer is on (you can choose your preferred color during setup), and it turns red if there are any issues, such as running out of paper or ink.
The only other prominent feature is the paper tray, which protrudes from the printer body, giving the Sprocket Studio an odd, asymmetric shape. However, we found that this design grew on us after a few uses.
The straightforward physical design of the Sprocket Studio makes it incredibly easy to use, a simplicity that extends to the app and the photo printing process.
App Design
The HP Sprocket Studio operates via a Bluetooth connection to your phone, with all printing controlled through the Sprocket app. The app is very intuitive and easy to use, guiding you step-by-step through the setup process, including how to insert the ink cartridge.
Once connected, the app displays all the pictures on your phone and can also show images from Instagram, Facebook, and Google Photos if you link these accounts through the HP Sprocket app. You can organize the images by their source folders, and if your phone supports RAW images, the app will display those as well.
As previously mentioned, the app offers a suite of editing tools to tweak your image before printing. You can adjust exposure to increase brightness, tweak colors, add preset filters or text, giving you plenty of creative freedom.
For further customization, you can add borders, stickers, and even your drawings. While the idea of adding personally designed stickers is unique, it doesn’t always work perfectly in practice. The app often struggles to recognize a drawing, especially if the lines are thin. Even drawings done with a thicker marker were sometimes missed. It works best with solid block colors. Though it would be an excellent feature if it worked well consistently, the app includes a library of pre-set stickers to choose from, saving you the hassle of creating your own.
Performance
In short, the Sprocket Studio produces good-quality photo prints. While they aren’t perfect, the details are well-preserved, and the colors are accurate. The imperfections we noticed include a faint vertical line on the right edge of our test prints and some instances where the dye had run slightly horizontally, likely due to dust particles on the photo paper. It’s advisable to ensure your photo paper is free from dust before printing. These minor flaws are generally only noticeable under close inspection.
Unlike the smaller Sprocket, which uses zero-ink (Zink) technology that embeds color in the Zink paper, the Studio prints using dye sublimation.
The dye sublimation process is relatively slow, as the paper runs back and forth through the machine for each color layer—first yellow, then magenta, cyan, and a clear top coat. While HP claims a print time as fast as 61 seconds per print, our tests showed it was slower, averaging around 80-90 seconds from start to finish.
This isn’t too bad if you’re printing a few snapshots at a time, but if you’re creating an album or collage, the time can add up.
The supplied photo paper has perforated sides on each short edge, with the image printed between them. This allows you to pick up the final result immediately after printing without worrying about smudged ink. The blank edges can then be torn off, leaving you with a neat 4 x 6 print.
However, this didn’t work perfectly in our tests. In all eight of our test prints, the Sprocket began printing about 5mm over the perforations (though it ended accurately). This can be an issue if important elements of your photo are near the edges of your composition.
Final Thoughts
Before the Studio, HP’s Sprocket family could only print smaller, wallet-sized photos. With the Studio, you can print larger, higher-quality photos that fit photo frames.
It’s easy to use, and the photo editing features in the app can add a personal touch to your smartphone’s camera roll. However, creating custom stickers doesn’t work as well as we had hoped, and the need for a slightly bulky power supply means this Sprocket isn’t as portable as HP’s other instant printers. Despite this, it’s a fun way to get good-quality photo prints at home.
Whether it’s affordable or not is another matter. Like any printer, there are ongoing costs for additional ink and paper. If the price of the printer itself (which only prints 4×6 photos) were a bit lower, it would be easier to recommend the Sprocket Studio.


